
Meet DevOps Engineer Intern Jonathan Quesada Salas
Step into my world of discovery and growth! I'm Jonathan Quesada Salas, and my journey with Wind River opened doors to an amazing world of tools and technologies. Cutting-edge technologies such as Kubernetes, Helm, Jenkins, and more, that enhance my skills as a DevOps Engineer intern. Join me on this captivating blog as I unveil the challenges I encountered and the invaluable lessons I learned along the way.
Why Wind River?
Attention fellow high-tech enthusiasts! Let me transport you to the Wind River environment where my journey as a DevOps Engineer Intern took flight. What fueled my enthusiasm to take advantage of this opportunity? It was the company's unmatched reputation for technical prowess and unwavering dedication to delivering exceptional solutions. But that's just the tip of the iceberg! Prepare to be mesmerized by Wind River's relentless pursuit of technological innovation such as breakthrough advances in the Internet of Things (IoT), virtualization, mission-critical system deployment, and enterprise industrial automation. Together, we will unravel the fascinating story of my experiences, challenges, and triumphs within this exciting world of limitless possibilities.
My experience about the challenges in my internship
Challenge 1:
Situation: Streamline the manual management of tools like Artifacts within the wr-studio-installer project. Say goodbye to tedious work and complex errors. Discover a hassle-free solution to effortlessly handle your tools. Save time and indulge in a captivating tool management experience!
Indication: Improve the management process of the Artifacts tool.
Actions:
1. My team leaders, Gabriel Vidaurre and Andrés Salas, approached me with a captivating challenge: automate the manual management of the Artifacts application.
2. With clear instructions for the task at hand, we collaborated with fellow interns Angelica and Gabriel, dividing the work effectively.
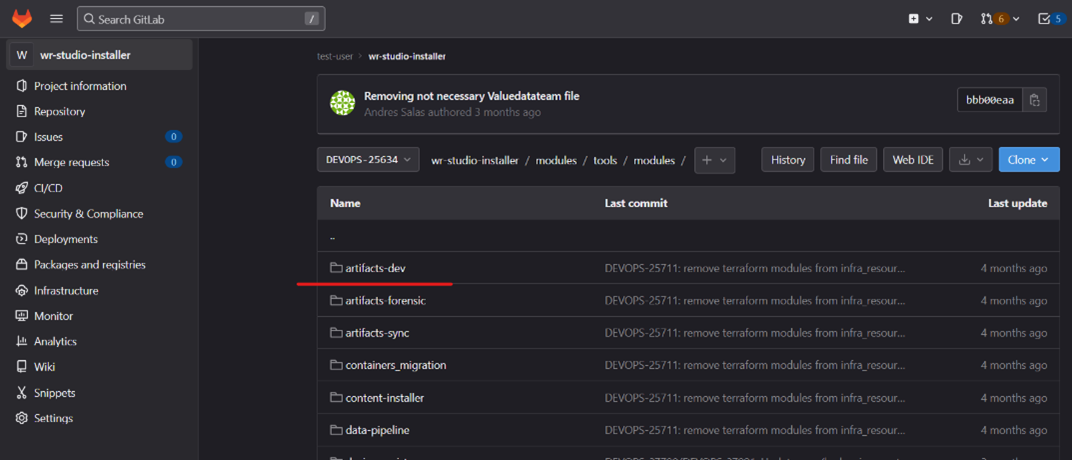
3. We identified the dependencies that the Artifacts tool has with other projects, namely "tozny-clients-dev," "wr-studio-installer," and "wrstudio_internal." Each project plays a crucial role in the Artifacts ecosystem:
tozny-clients-dev: Facilitates the management of Tozny users' workflow.
wr-studio-installer: Houses a diverse range of Wind River applications, ensuring seamless deployment.
wrstudio_internal: Designed for internal development purposes, this repository allows testing and deployment in non-production environments using a driver-managed cluster. Currently, blueprints are available for mcp and data pipeline installations.
4. We meticulously modularized the Artifacts application to enable its portability beyond the confines of the wr-studio-installer project.
5. To facilitate modularization, we introduced a necessary tfvars extension file. This file conveniently stores all the variables required by the Artifacts terraform application.
6. Once the application was successfully modularized, we validated its functionality using essential Terraform commands such as init, plan, apply, and destroy.
7. With the Artifacts application performing flawlessly, we captured the entire process in a captivating pipeline.
8. While creating the pipeline, we paid close attention to relevant credentials, including AWS and Vault credentials. This ensured the smooth execution of the application through a Jenkins pipeline.
9. It's crucial to note that throughout the execution, we employed S3 configuration to capture the previous state of the Terraform application. This allowed us to initialize with "terraform init" and subsequently remove any disqualified previous instances with "terraform destroy."
Results:
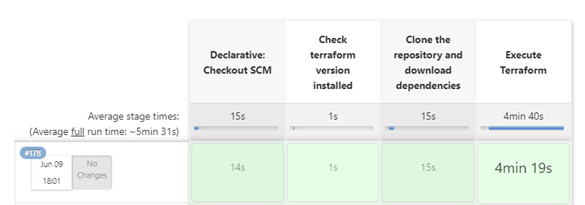
The modularization of the Artifacts application was successful so that it can be executed through a pipeline in Jenkins. It took approximately one week for the correct modularization and validation of the equipment.
For a better visualization below you can see the pipeline and the link of it:
https://jenkins.datateam-uswest1.dev.wrstudio.cloud/job/Artifacts/job/Terraform-automation/
Why is this pipeline necessary?
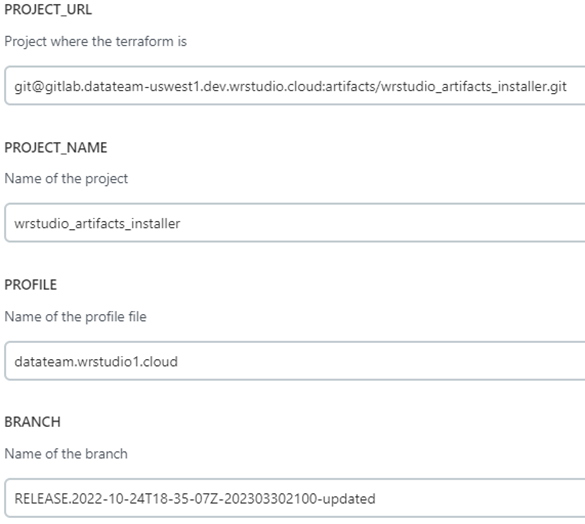
For people interested in deploying the operation of Artifacts, the only thing they have to do is enter parameters to the pipeline and the pipeline will take care of executing all the necessary procedures so that the user does not have to go through any tedious manual process. Below is an image of the parameters that must be entered into the pipeline:
An explanation of the parameters:
PROJECT_URL: URL link of the Artifacts project that you want to run
PROJECT_NAME: name of the project
PROFILE: name of the profile that is being used; tfvars file that is the one that contains all the variables necessary for the execution of the application
BRANCH: The name of the project branch you want to use
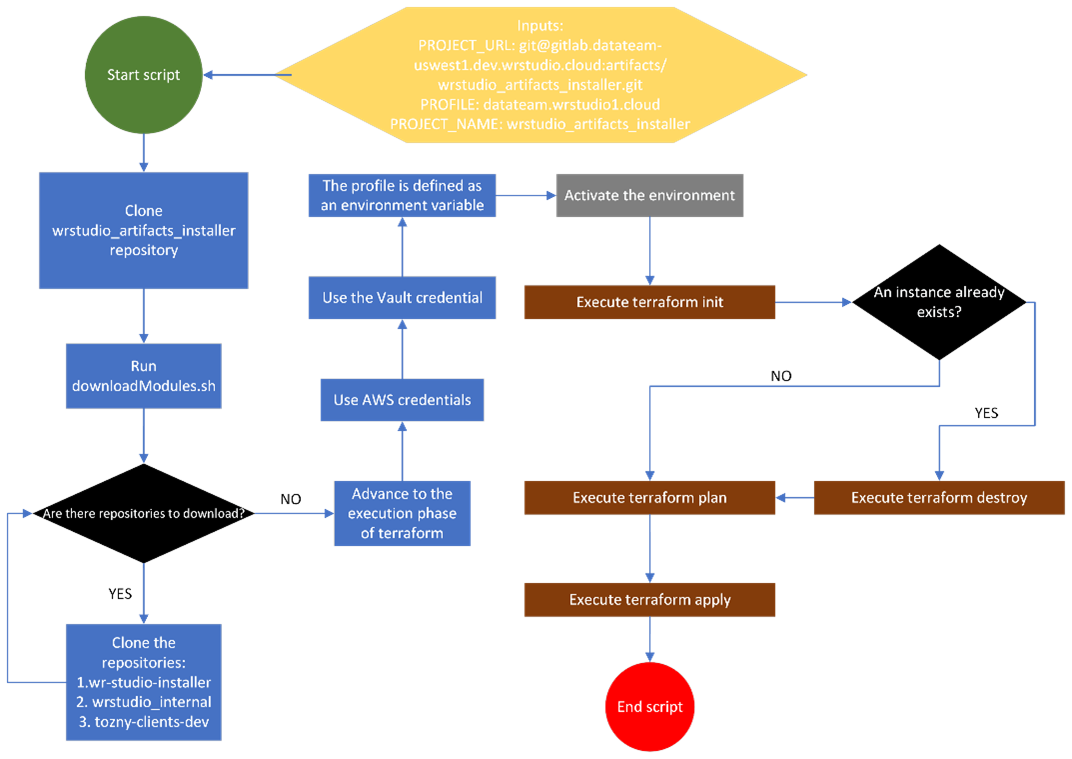
Script flow
For a better high-level functionality you can see the following diagram for a better understanding:
Challenge 2:
Situation: Revolutionize Image Uploads with Seamless Automation
Introduction: Say goodbye to manual and laborious procedures for uploading new images to the Datateam's ECR instance. We have developed an ingenious solution that will make image synchronization a breeze!
Actions:
1. Unveiling the Power: Our visionary leaders, led by the brilliant Gabriel Vidaurre, have unlocked the secrets of automating image synchronization. Prepare to be amazed as we dive deeper into this groundbreaking process.
2. The Game-Changing Tool: Enter dregsy, the ultimate game-changer. This powerful tool empowers you to effortlessly synchronize container images across any registry, be it public or private. Get ready to witness a seamless flow of image synchronization like never before.
3. Mastering the Art: We invested time and effort in comprehending the intricacies of dregsy. Our dedicated team studied every nook and cranny of this tool to implement an automation system that will leave you in awe.
4. Introducing windshare_migration: To further enhance the experience, we harnessed the capabilities of "windshare_migration," an indispensable driver that seamlessly manages the installations of WINDSHARE MIGRATION to WR Studio. Brace yourself for a smooth and streamlined synchronization journey.
5. Empowering Efficiency: Utilizing this innovative driver, we enable you to effortlessly execute dregsy, simplifying the process of obtaining the synchronized images you desire. No more hassle or wasted time—let our solution do the heavy lifting for you.
6. Unleashing the Potential: With the images you wish to synchronize in hand, a series of carefully orchestrated commands will unlock the configuration file you need. This crucial file will seamlessly guide dregsy in uploading your images to ECR, ensuring a future where image synchronization is a breeze.
![]()
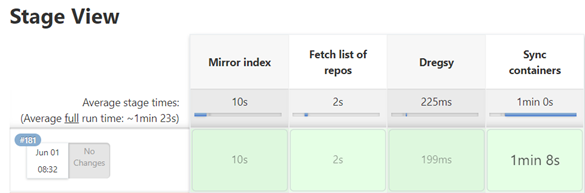
7. Already having the configuration file in a specific path (in this case "/tmp/export/") it can be read by Jenkins so that it can synchronize the images from the source repository to the destination repo with the follow command:
![]()
Results:
The execution of the image synchronization automation was successful, allowing flexibility for the user in terms of the images that he wants to upload to a target instance from any source repository. It took approximately 2 weeks to verify the operation.
For a better visualization below you can see the pipeline and the link of it:
Why is this pipeline necessary?
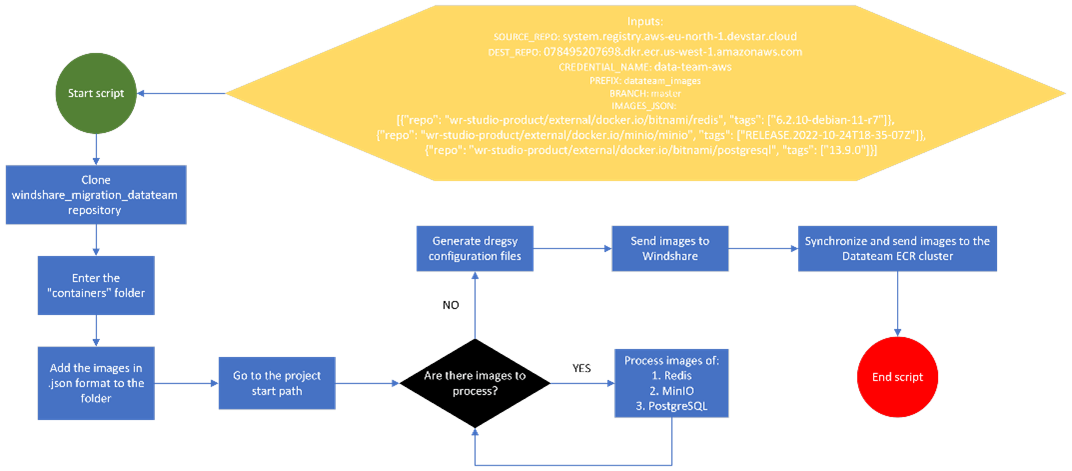
Imagine a dynamic Data team running multiple projects reliant on MinIO, PostgreSQL, and REDIS images. To fuel their innovative endeavors, these images must be seamlessly obtained from the Devstar cluster's Harbor. However, a direct transfer to the Data team cluster is not feasible without a vital intermediary. Enter our game-changing pipeline! We bridge the gap by effortlessly transferring those invaluable Devstar images to the ECR of the Data team cluster. Experience a seamless flow of resources, empowering your team to reach new heights of productivity and success.
Explanation of the parameters that must be entered into the pipeline:
SOURCE_REPO: This variable is in charge of establishing where the Harbor images will be extracted
DEST_REPO: This variable is the one that expresses the destination repository that the images will have, in this case the ECR cluster of Datateam
CREDENTIAL_NAME: This variable will be in charge of defining the AWS profile that a person may have, meaning you can use any AWS profile of your choice
PREFIX: This variable is a prefix in case the user wants to add it when using the pipeline; usually it can be an empty string
BRANCH: This variable is the branch of the windshare_migration project in which the pipeline will be executed
IMAGES_JSON: This variable is in charge of containing the images that you want to send to the datateam ECR cluster, with only the repository and the tag.
Script flow
For a better high-level functionality you can see the following diagram for a better understanding:
Challenge 3:
Situation: Streamline Your Operations: Automating the Patroni Application in Datateam
Introduction: Say goodbye to manual management headaches and embrace seamless automation! The Datateam is about to revolutionize the way it handles the Patroni application, and you don't want to miss out on this game-changing transformation.
Actions:
1. Guided by Visionary Leaders: Eager to embark on this automation journey, I sought guidance from our esteemed leaders. Their expert advice? Dive deep into each stage, unraveling the secrets to automating the entire Patroni process.
2. A Synchronization Breakthrough: The first stage unveiled a groundbreaking approach. Leveraging a cutting-edge synchronization pipeline akin to the existing one, we seamlessly extract the Spilo image from the renowned Zalando repository. However, here's the twist:
The image is now directly reflected in the Datateam Harbor, unlocking a world of possibilities.
https://jenkins.datateam-uswest1.dev.wrstudio.cloud/job/Patroni/job/patroni-sync-image/

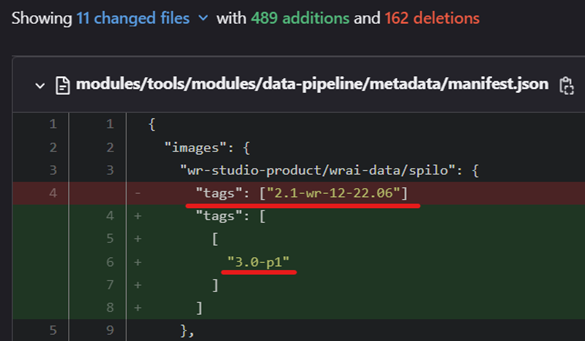
3. Powering Up with Programs: Armed with open-source image extraction, the next step is to develop powerful programs that effortlessly update the tag of the new Spilo image within the Datateam's Patroni project (wrstudio_patroni_installer) and the "wr-studio-installer" project. Brace yourself for streamlined updates and enhanced deployments of the latest tools.
4. Smooth Tag Transition: The specific Spilo tag must replace its counterparts in the aforementioned repositories, ensuring the new image tag value is captured flawlessly in a dedicated branch. No more disruptions to crucial processes in the master or main branch. Brace yourself for automated tag replacement, paving the way for smoother operations. Check out the Jenkins link below for an inside look at our pipeline for tag value automation:https://jenkins.datateam-uswest1.dev.wrstudio.cloud/job/Patroni/job/patroni-upgrade/
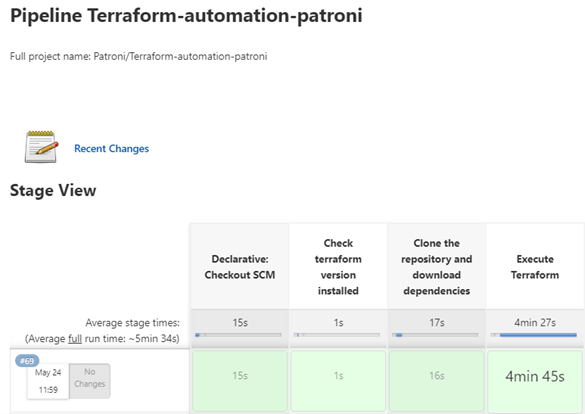
5. After having successfully replaced the tags where the Spilo image was used, the Patroni Terraform application should be run with the new Spilo image found in Harbor. The procedure is very similar to the previous process described in Artifacts, the tfvars file must be used as input to the pipeline, which will contain all the variables necessary for the Patroni Terraform application to work. Below is the Jenkins link of the pipeline for Patroni automation:
https://jenkins.datateam-uswest1.dev.wrstudio.cloud/job/Patroni/job/Terraform-automation-patroni/
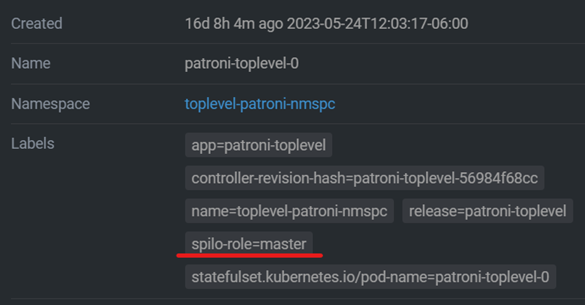
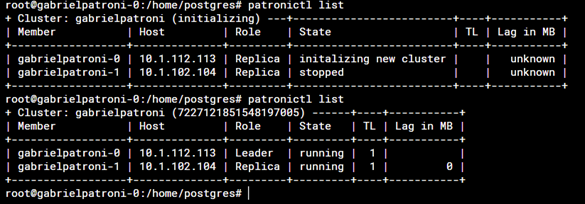
6. In order to confirm that the execution of the application in Patroni's Terraform was successful, you must enter the pods generated in Lens. For example:

7. Within the configuration (Labels) of the 2 Patroni pods, it must indicate that one pod is the master and the other pod must be the replica. If both pods have their specific role, the Patroni instance is ready to be tested.
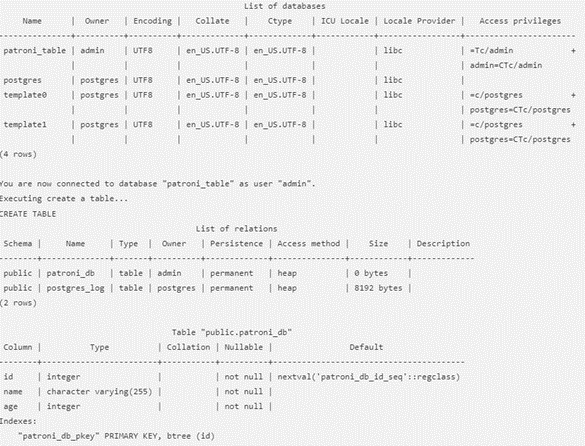
8. I tested the operation of the created Patroni instance using smoke tests, so that it can be connected to the Patroni service and enabled to make queries such as user creation, tables, roles and run various other verification queries. The output of the pipeline should be like this:
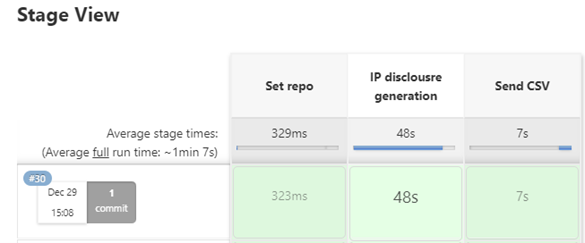
9. The last stage is making Patroni's IP disclosures so that this entire process is verified and approved. The pipeline will have this flow:
Results:
The Patroni run was fully automated so that you can simplify the process of testing and running Patroni for your team. It took approximately 6 weeks for the validation and verification of the equipment with respect to the total operation.
To access the pipeline in case you want to try it, you must enter the following link:
https://jenkins.datateam-uswest1.dev.wrstudio.cloud/job/Patroni/job/top-level-patroni/
Why is this pipeline indispensable?
Imagine a world where tedious, time-consuming manual processes become a thing of the past. Introducing our revolutionary pipeline, designed to accelerate the execution of a complex workflow that has traditionally drained valuable time and resources. Say goodbye to monotonous tasks and embrace a future where automation reigns supreme.
Supercharging Efficiency:
-
- The Need for Speed: Our pipeline is specifically crafted to turbocharge the entire execution process. No more wasting hours on laborious manual tasks. We've engineered a solution that empowers you to reclaim precious time, allowing you to focus on high-value activities like automated tests and cutting-edge advancements.
- Unleashing the Power of Automation: With our game-changing pipeline, your team can bid farewell to mind-numbing manual efforts. Experience the exhilaration of streamlined workflows, freeing you from the shackles of mundane tasks and unlocking new levels of productivity.
- Saving Time, Unleashing Potential: By automating this process, we open the door to a world of possibilities. Imagine the extra hours you'll gain, ready to be invested in strategic initiatives, comprehensive testing, or exploring innovative solutions. Embrace the power of automation and watch as your team achieves more than ever before.
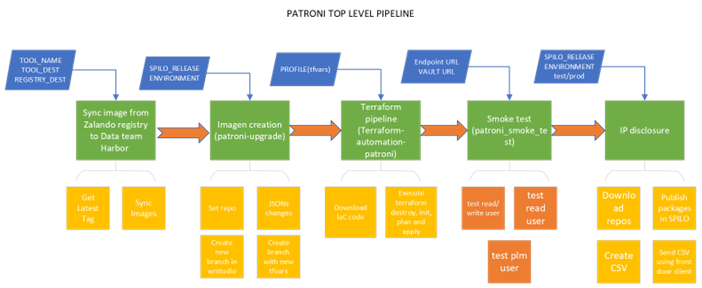
For a better visualization, you can see the total execution of Patroni as follows:
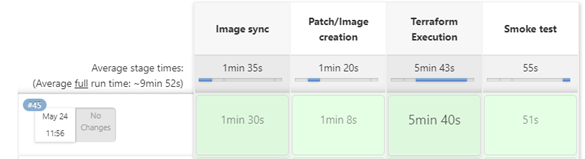
Script flow
For a better high-level functionality you can see the following diagram for a better understanding:
Challenge 4:
Situation: Unleash the Power of Performance: Benchmarking MinIO Versions in Datateam
Introduction: In the quest for optimal performance, the Datateam has set its sights on the revered MinIO object storage server. Join us as we embark on an exciting journey of exploration and optimization.
Unveiling the Quest:
1. Expert Guidance: Before delving into the performance benchmarking task, we sought invaluable advice from industry experts. Armed with their wisdom, we set out to conquer the challenge with a strategic approach.
2. Harnessing Resources: Success begins with the right tools at your disposal. We meticulously identified and established the necessary resources for our performance benchmarking endeavor. Prepare to witness the power of a well-equipped team, poised for greatness.
3. Unearthing Hidden Treasures: Within the depths of the Datateam cluster lie the sought-after resources needed for our performance benchmarking mission. With relentless determination, we scoured the cluster to uncover the very building blocks of success.
4. Scripting Brilliance: Armed with the resources at our fingertips, we embarked on crafting a masterpiece—a script designed to execute a performance benchmark on the illustrious MinIO object storage server, version 23.03. Get ready to witness the artistry of scripting as we unlock the true potential of MinIO's performance capabilities.
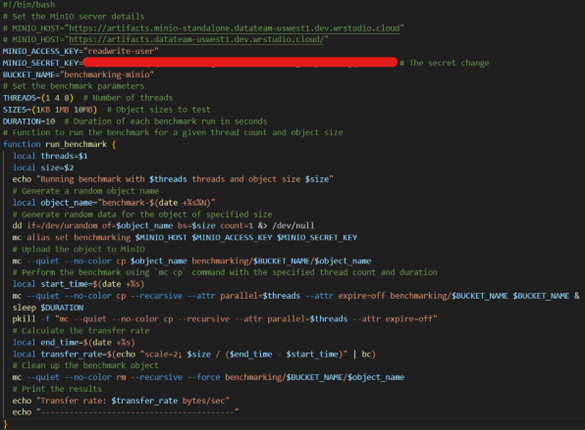
The main function of the script is the "run_benchmark" function. This function takes as arguments the number of threads and the size of the object, and performs the following actions:
-
-
-
-
- Generates a random object name.
- Generates random data for the object of the specified size.
- Set up a connection to the MinIO server using the "mc" tool (MinIO Client).
- Uploads the object to the specified bucket on the MinIO server.
- Performs the benchmark using the "mc cp" command with the specified number of threads and duration. This command performs a recursive copy of the objects in the bucket and uses parallelization and timeout attributes.
- Calculate the data transfer rate in bytes per second.
- Clears the MinIO server benchmark object.
- Prints the benchmark results, including the transfer rate.
- The code itself defines the values for the variables used in the "run_benchmark" function and then calls the function for different combinations of threads and object sizes defined in the "THREADS" and "SIZES" arrays.
-
-
-
5. Carry out the same experiment with another version of MinIO, in this case the most up-to-date version of MinIO. You only need to change the MINIO_HOST to the targeted version
6. Compare times between versions.
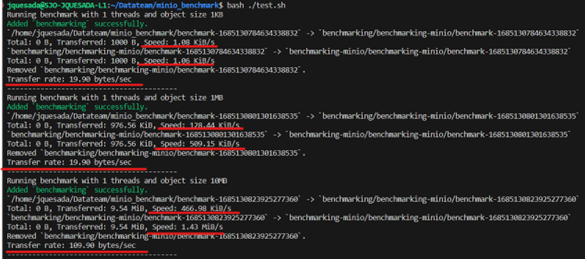
a. First, the test was carried out with the most recent image that Artifacts has in its Standalone in Data Team, the speeds of each execution thread were measured by measuring the data transmission speed per second (indicated in red):

b. Second, the Artifacts Standalone test was carried out with the 23.03 version that was carried out by the Data Team and these were the results (indicated in red):
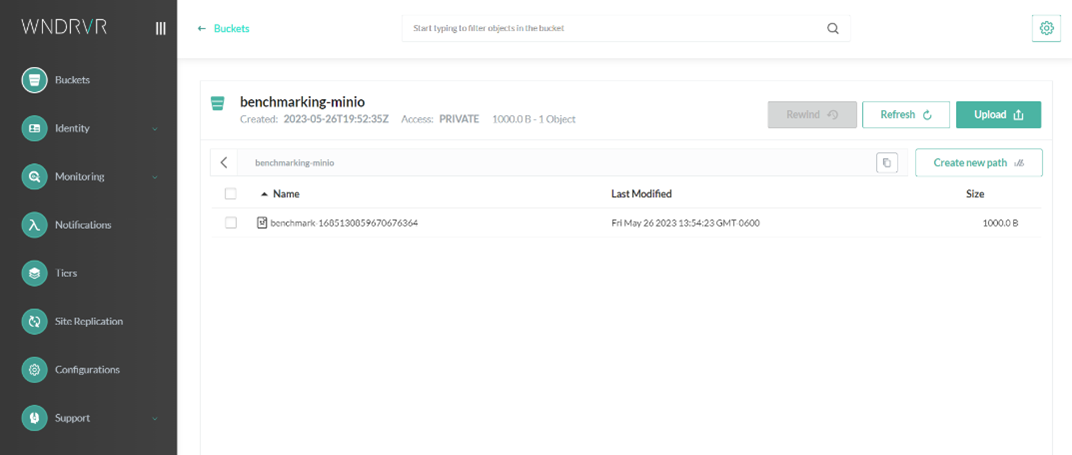
7. To verify that the process is successful, it is necessary to enter "Ingresses" in Lens to be able to enter the relevant Artifacts/MinIO instance to enter the bucket that is being used to see if there are used files loaded in the instance, like this:
Results:
The results were concrete in terms of the functionality of each of the MinIO versions, as can be seen in previous images, it is noted that there is not much difference between execution times, which makes us understand that there is no anomaly in terms of storage. Approximately 3 days were spent on this task.
Why is this process necessary?
This performance benchmarking process on different versions of MinIO is vitally important for the success and efficiency of the Datateam. By conducting extensive and benchmark testing on each version, we are able to identify MinIO's strengths and weaknesses in different scenarios and workloads. This allows us to make informed decisions about which version is the most suitable for our specific needs, maximizing performance and optimizing our resources. Furthermore, by staying on top of the latest releases and conducting regular evaluations, we ensure that we are always at the forefront of technology and get the most out of MinIO. In short, this benchmarking process is critical to ensuring efficient object storage and management, fueling the Datateam's continued success in its pursuit of technological excellence.
Challenge 5:
Situation: Unleash the Power of Precision: Fixing the Patroni Pod Bug
Introduction: In the world of Terraform and Patroni, even the smallest bug can disrupt the delicate balance of pod roles. Join us on a journey of discovery as we uncover the solution to this critical issue and restore order to the realm of pod assignments.
Actions:
1. Collaboration at its Finest: Guided by the expertise of Gabriel Brenes, we embarked on a quest to conquer the pod bug. Through our collaborative efforts, we discovered a solution that would bring harmony back to the Patroni instance
2. Commanding Change: Within the shell of the pod, a powerful command awaits execution. With precision and finesse, we issue the transformative command: patronictl remove <namespace>. Watch as the magic unfolds and the pod regains its rightful role.
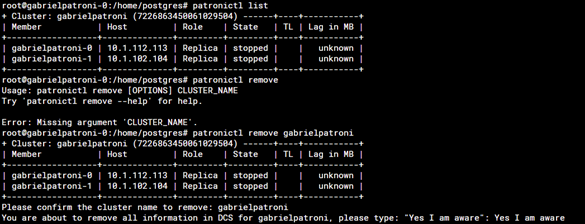
a. After that, the pods will restart and now one of them will be assigned with the spilo-role=master
3. This problem occurred because when terraform destroy was executed, an endpoint stayed there and was not deleted. This endpoint contained a parameter called "initialize", which is a number used to identify if the Patroni cluster has already initialized and if so we would need to run the Terraform again this will generate the problem since although the pod, persistent volumes, persistent volume claims and other resources were deleted by terraform destroy command, the endpoint is still there and Patroni assume that the Patroni cluster still exists. To solve this, the endpoint must be deleted after running terraform destroy using this command: kubectl delete endpoints <endpoint_name> -n <namespace> --ignore-not-found. The name of this endpoint usually ends with "<enpoint_name>-config", the whole process looks something like this:
1) terraform destroy
2) kubectl delete endpoints toplevel-patroni-config -n toplevel-patroni-nmsp --ignore-not-found
Results:
Successfully fixed the bug so that each Patroni pod had a role. It took us approximately 3 days to find out what the error was.
Why is this process necessary?
This process is required to rectify a critical bug in Patroni pod role assignment. When the Terraform instance creates two pods, neither of them is assigned the role of spilo-role=master, instead both are given the role of spilo-role=replica. This misalignment compromises the proper functioning and performance of the system.
Correcting this error is vital to ensure that pods perform their specific roles appropriately. The spilo-role=master role is critical to the proper functioning of Patroni, as this pod handles crucial leadership and coordination functions in the cluster. Without a pod with this role assigned, the stability and efficiency of the system is compromised.
By fixing this bug, we restored the integrity and balance of the Patroni cluster, ensuring that each pod performs its designated role precisely. This guarantees a stable, reliable and optimal environment for data storage and management in the Datateam infrastructure.
Challenge 6:
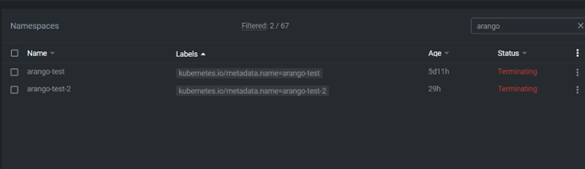
Situation: In the realm of DataTeam's ArangoDB cluster, a pesky issue has emerged. Despite issuing the "terraform destroy" command, lingering namespaces persist, consuming unnecessary resources. Join us on a journey of discovery as we unveil the solution to this resource-draining predicament.
Introduction: Fix the error to avoid the consumption of unnecessary resources in the DataTeam cluster
Unveiling the Solution:
1. Seeking Expert Assistance: Acknowledging the complexity of the issue, we turned to the expertise of Gabriel Vidaurre. With his guidance, we set out to rectify this lingering namespace conundrum.
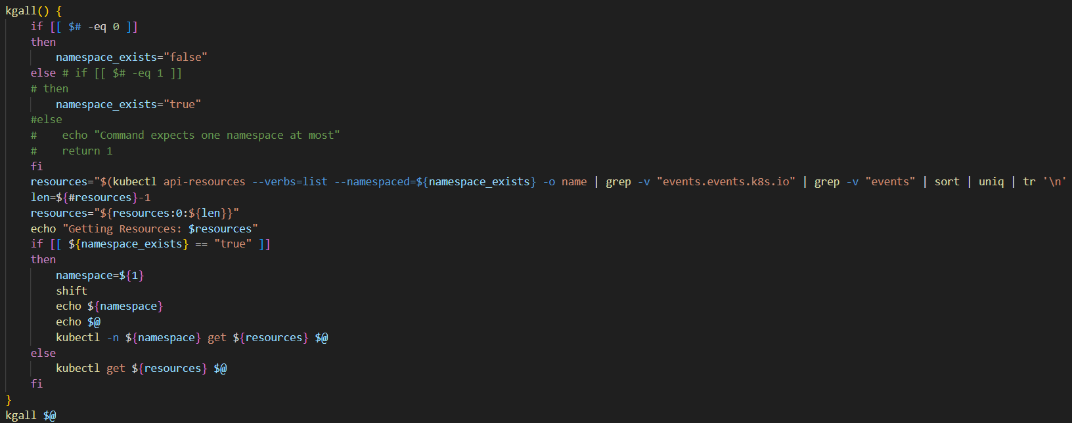
2. The Scripted Solution: Our path to resolution became clear—a meticulously crafted Bash script. With precision and finesse, we executed the script, ensuring that the problematic ArangoDB namespaces would be eradicated. Let us guide you through the process step by step.
3. Triumph in Action: Witness the power of our solution as the script executes, generating a reassuring output. Behold, as the persistent volume claims and pods associated with ArangoDB vanish from the cluster, freeing up valuable resources for more essential tasks.
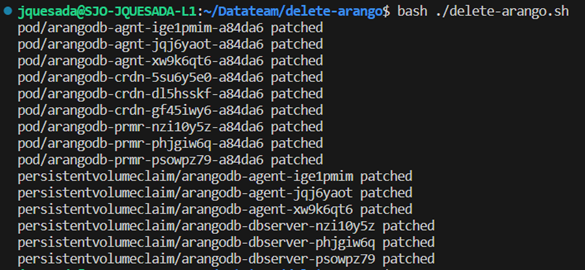
(This output confirms that all Persistent Volume Claims and pods were removed)
4. Missing Resource Mystery: As we delved deeper, we encountered a missing resource named "arangodeployment.database.arangodb.com/arangodb." But fear not, for we possess the key to resolving this enigma.
5. The output would be the following:
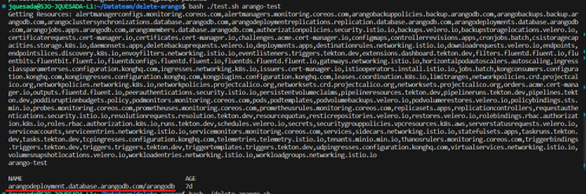
6. As you can see, it is necessary to delete a resource called "arangodeployment.database.arangodb.com/arangodb" (marked in red in the previous image) so that the namespace can be deleted correctly. We have to open Lens, select "Custom Resources" then "database.arangodb.com", and at the end enter "ArangoDeployment". Now we can enter the instance that needs to be deleted called "arangodb" as in the image:
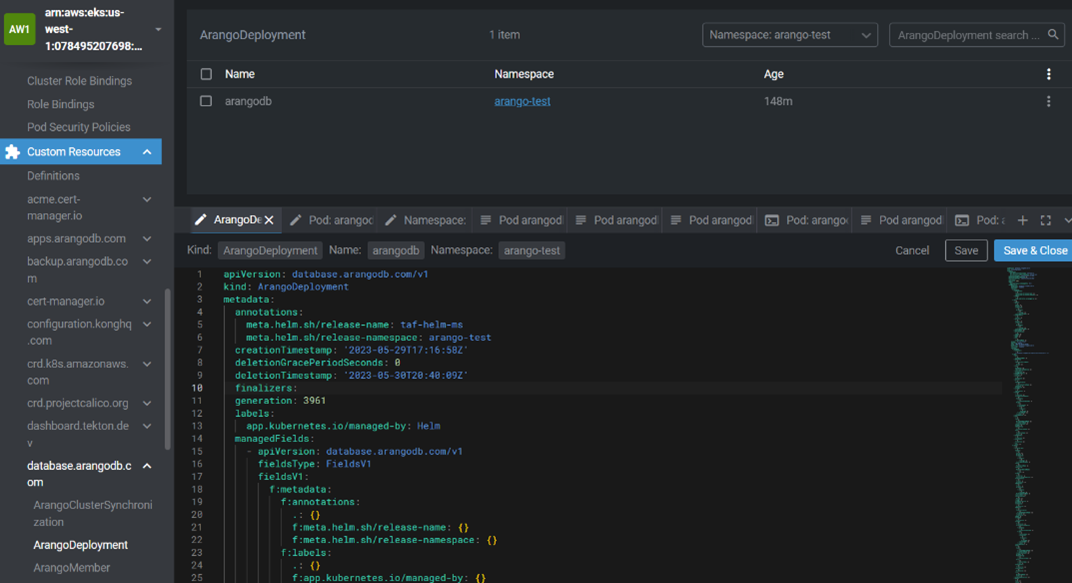
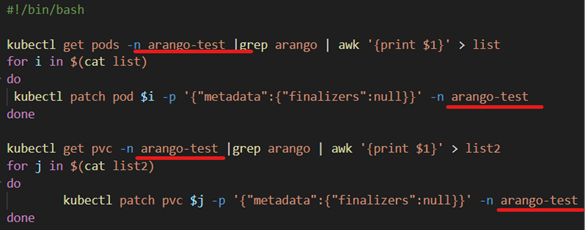
7. The way to delete the "arangodb" resource is as follows:
-
-
- Edit the resource
- Search for "finalizers"
- In the case that "finalizers" has some content, it must be eliminated so that it remains the same as it is shown in the previous image
-
8. Total Annihilation: With each step completed, we approach the final phase—complete elimination of everything ArangoDB-related. Witness as the remnants of this conundrum are obliterated, leaving behind a pristine environment.
Results:
The result was satisfactory because everything related to Arango could be eliminated so that there is no waste of unnecessary resources in the DataTeam. This task lasted approximately 3 days.
Why is this process necessary?
This process is required to resolve a critical issue in DataTeam's ArangoDB cluster. Despite running the "terraform destroy" command to destroy the ArangoDB instance, the namespaces persist in a terminal state without being completely removed. This leads to excessive resource consumption in the cluster, which can negatively affect overall system performance and efficiency.
By fixing this bug and deleting the namespaces appropriately, we free up valuable resources within the DataTeam cluster. This ensures optimal resource reduction and avoids wasting storage capacity and processing power on resources that are no longer needed.
Furthermore, by completely removing the ArangoDB namespaces, we maintain the integrity and cleanliness of the cluster, avoiding potential conflicts or interference with future implementations and improvements to the system.
In summary, this process is necessary to correct the persistent problem of namespaces in ArangoDB, optimize the use of resources in the cluster and ensure a clean and efficient environment for data management in the DataTeam infrastructure.
About the author

Jonathan Quesada Salas is an Associate Engineer at Wind River
Wind River Blog
The Wind River Blog is made up of a variety of voices: executives, technologists and industry enthusiasts. We hope to foster conversations and encourage the sharing of insights regarding the evolving landscape of intelligent, connected systems with our ecosystem of customers, partners and colleagues.